Showing posts with label v-ray. Show all posts

6.08.2007

Tutorial: understanding V-ray in deep

<>
There’s no just english sites to find a great educational material, but you can find in many parts of the world people producing excellent tutorials.
This time we’re going to Spain!
Few years ago, Pedro Saiz Bilbao realized a very informative pages about V-ray and its settings. Many examples, many images, many experiments.. I love his work: very, very useful.
This tutorial has been wrote for V-ray 1.49 but it’s valid too. I often use it to remember details or settings values. Check and add it to your bookmarks!
V-ray panels in deep

Using RPC with V-ray the shadows doesn’t work. Why?

A reader ask to me why the RPC (Rich Photorealistic Content) doesn’t project shadows using V-ray.
Yes, it’s right. There’s some problem using both RPC and V-ray. When I had the same problem I must retouched the render with Adobe Photoshop. That was the only solution I found.
But not any RPC Archvision library has the same bug. There’s same collection that works fine, for example the Cars.
Anyway if you already completed your work and RPC doesn’t project shadows I suggest to “repair” it with a little postproduction (with Photoshop for example).
I think this is the best and fast way.
Besides if you want to get a more photorealistic renders I suggest to try different solutions like 3d low-poly people, for example Axyz-Design.
It allows a free download to try the models so… enjoy it!
Axyz Design: Free 3d models - Low Poly

How to make a digital photographic set with V-Ray

To obtain a good rendering it’s not just parameters and settings knowledges, but it’s something like the real photo: light composition, shade and scene composition.
So to make a good rendering we have to create a good photographic set and put our object in.
I found a excellent tutorial on cgindia.org: how to make a perfect digital photographic set. In this tutorial you can have a look at vray settings. In spite of everything I think this tutorial is very important to understand how to set a digital set with classic rules: primary light, secondary light and back light.
Photographic set: how to make it with Vray

Rendered without Global illumination

Now is easier setting a 3d scene: we can use Global illumination or same Un-Biased engine render like Maxwell render or Indingo. But in the past, when PCs was not so powerful we was used to render with scanline or something like that.
Why actually anybody use these old render engines? Maybe we love super excellent quality… sure! But we can obtain hi quality render with old technics!
If you know classic “real” lighting technic and you work with fine with photoshop you could have a great render in few minutes… or seconds!
I’m really impressed by an image found on Cg Society: look that and tell me what do you think!
Rendered without Global Illumination

Vray Rusty metal shader - Free

I played with Vray shader options and I realized a Rusty metal shader.
I would to share it with you!
I used Blend shader to mix to different material: metal chrome and rusty surface. Metal chrome has a simple setting (reflection 100%) as a mirror. Rusty material has a texture a little bit bumped by itself. Finally I have 1 texture I use to mix them.
I hope you like that… Suggestions and comments are very welcome. The result is the same you are viewing in this image. The scene contains light and rendering settings too.
Download now :: Vray Rusty Metal shader

Vray interior: download setted scene

Download V-ray setted scene and just clic render button!
I would to share with you an interior scene, setted for Vray engine render. It works with V-ray 1.47 and V-ray 1.5 too.
My settings is very simple: I used 5 vray lights, one direct light to simule the sun (in this version I don’t use Vray sun). Exponential as color mapping algorithm… all the light emitters are calibrated between them: you just have to clic render to obtain your nice scene.
I suggest to use this scene to study settings and as start to new scene setting.
Download my V-ray interior scene

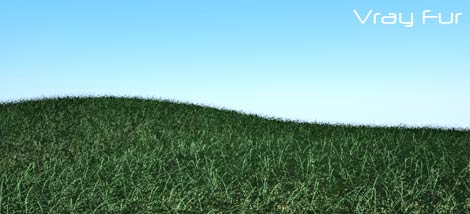
Realistic grass with Vray Fur

In the last file I showed you how to set VrayDisplacement to obtain realistic grass or carpets. It’s a good solution for middle camera shots.
But how can do if your grass is really near to the camera? You need more details to obtain a realistic render, so it’s time to use Vray Fur!
if you need more information about V-ray fur you could have a look to the official V-ray guide: Vray Fur.
If you need same nice tutorial to understand how to create a grass with vray fur have a look here: Vray Fur tutorial
If you want a very nice scene (xp Style!) to just clic “render” download my gift!
Free Scene: Grass with Vray Fur

Vray parameters: Vraysun and sunset settings

Here the second scene made with Vray sun, this time we have a different atmosphere: the sunset!
It’s very easy to use it, you just need to download it, starting 3d studio max and go testing changing all the parameters with fantasy!
The parameters aren’t not so different from the last scene, the most important change is the sun position. As in the reality the color of the sun changes with the inclination, so you have a darker scene with more orange colors.

I’ve changed Vraysun multiplier and color mapping too. Here same information about the setting. Read in bold the parameters I changed:
N° of lights_ 1Vray Sun intensity_ 1,0Color Mapping_ HSV Esponential (1,4-1,2-1)GI Enviroment _ Skylight (1.0)Time to render_ 1′ 43″ (640×480)
Download Vray sunset