Neteye Website Relaunch

Neteye the Hamburg based interactive agency just launched their new website. Discover lots of cool works in a new way of interactive showreel. Neteye
 Koehorst in 't Veld is a graphic design studio based in Rotterdam. Art Directors of our beloved FRAME Mag. Another indication that the Dutch do it right!
 Meet Cédric Decroux (1976), Axel Jaccard (1977) and Yves Fidalgo (1976)...they are swiss bred, Fulguro. awesome works of all kind.
Texture of Stones… wall… marble… wood… fabric, but especially free textures?
If you are searching for free textures to download no problem! Here my little personal link collection of high resolution textures:
Texture King - Free Stock Textures! Great!!!
Mayang Textures - Over 3400 textures free to download
Cg Texture - Many textures and tutorials related
Wood: Arroway texture - Please, don’t abuse the system! Download only textures you really need.
Texture Wharehouse - Free, High Resolution Textures to Designers and 3D Artist.
Marble Textures - A large marble’s texture collection
Mega Textures - Mega-Tex Studios offers you lots of high quality textures in various categories.
I hope you like my little collection.Bookmark this in your favourite pages and enjoy it!
 OceanWaves is a very, very interesting plugin to simulate…. Ocean Waves, obvious!
It’s created by Charles Hollemeersch and it’s incredible how it get a ocean model so similar from the real ocean waves!
This 3D Studio Max plugin adds a new geometry object which generates a statistically generated ocean wave suface. It allows you to set parameters like wind direction and strength, required detail, … to control the aperance of the sea surface.
This is the same technic used in the movie “Titanic” to generate the ocean.
It’s so simple to use: this 3D Studio Max plugin adds a new geometry object which generates a statistically generated ocean wave suface.
I think you could be surprised how simple and how incredible is this plug-in, so I encourage all of you to downlaod and try it… only try it once and you’ll love it.
OceanWaves Plugin
<>
There’s no just english sites to find a great educational material, but you can find in many parts of the world people producing excellent tutorials.
This time we’re going to Spain!
Few years ago, Pedro Saiz Bilbao realized a very informative pages about V-ray and its settings. Many examples, many images, many experiments.. I love his work: very, very useful.
This tutorial has been wrote for V-ray 1.49 but it’s valid too. I often use it to remember details or settings values. Check and add it to your bookmarks!
V-ray panels in deep
 A reader ask to me why the RPC (Rich Photorealistic Content) doesn’t project shadows using V-ray.
Yes, it’s right. There’s some problem using both RPC and V-ray. When I had the same problem I must retouched the render with Adobe Photoshop. That was the only solution I found.
But not any RPC Archvision library has the same bug. There’s same collection that works fine, for example the Cars.
Anyway if you already completed your work and RPC doesn’t project shadows I suggest to “repair” it with a little postproduction (with Photoshop for example).
I think this is the best and fast way.
Besides if you want to get a more photorealistic renders I suggest to try different solutions like 3d low-poly people, for example Axyz-Design.
It allows a free download to try the models so… enjoy it!
Axyz Design: Free 3d models - Low Poly
 <<>>
<<>>
This is the famous sentence from the movie “300″. As you can notice there’s a very massive use of visual effects (vfx) in the movie… surely, the most famous of this effects is Time Remapping.
This technic is often used in fighting scenes and it consists in going slowly and suddenly faster with footage. In this way it’s simple to create high impact scenes!
If you are interested in, you can have a look at this After Effects tutorial made by Andrew Kramer.Enjoy it!
Tutorial Time Remapping
 To obtain a good rendering it’s not just parameters and settings knowledges, but it’s something like the real photo: light composition, shade and scene composition.
So to make a good rendering we have to create a good photographic set and put our object in.
I found a excellent tutorial on cgindia.org: how to make a perfect digital photographic set. In this tutorial you can have a look at vray settings. In spite of everything I think this tutorial is very important to understand how to set a digital set with classic rules: primary light, secondary light and back light.
Photographic set: how to make it with Vray
 Now is easier setting a 3d scene: we can use Global illumination or same Un-Biased engine render like Maxwell render or Indingo. But in the past, when PCs was not so powerful we was used to render with scanline or something like that.
Why actually anybody use these old render engines? Maybe we love super excellent quality… sure! But we can obtain hi quality render with old technics!
If you know classic “real” lighting technic and you work with fine with photoshop you could have a great render in few minutes… or seconds!
I’m really impressed by an image found on Cg Society: look that and tell me what do you think!
Rendered without Global Illumination
 Photoshop tutorial. If you want to render any kind of frosted glass, you have to think about to notable increase of rendering time.
My personal solution is to render “normal” glasses with our render engines, and after abtain any kind of glass playing with Photoshop. You could be make many kind of Glasses in few seconds!
A software like Photoshop could be very, very helpfully to refine scenes: stop to make 3d images directly with your 3d studio max or Maya… think your render as a first part. The second one will be the photo retouch!
Follow this great tutorial:
Glass with photoshop
 Tekken 5 Dark Resurrection, a new incredible episode.
The most important fighting videogame,Tekken, is back! And now on PS3 high definition. It’s not a next-generation game, the gameplay is the same… so, what’s new?
Tha high definition, that makes exciting your playing experience, especially on big tv. There’s same faults too in the “poligonal engine” or in the explosions (always the same!). But generally sound effects and 3d graphic effects are really great.
So it’s funny fighting with your best friend..lol.. but just in your house, since it’s no possible playing online.
You can download this new version on the official site.It’s low cost if you have a Playstation 3 -> japanese consolle!
Tekken 5: official site
 Recently the official site of Ratatouille (Disney/Pixar) was updated! The trailer is completly new and finally we can see more details about the story.
I didn’t know but there’s the funny mouse with a young, bungling chef.
The two leading actors became friends and… see the trailer now!
Ratatouille, the trailer
 In Photoshop cs2 you can find a new feature named Vanish point.
If you want to replace same parts of your picture but you have problems with perspective, for exemple with bricked wall or wood floor, you can easly do it using the new option: Vanish point!
You can create your reference grid and use replacement tool (like clone tool) respecting your reference grid and your perspective.
Here 2 useful videotutorials to learn how to do it in deep:
Photoshop support: Vanish point
Watch and Learn: Vanish point
 I played with Vray shader options and I realized a Rusty metal shader.
I would to share it with you!
I used Blend shader to mix to different material: metal chrome and rusty surface. Metal chrome has a simple setting (reflection 100%) as a mirror. Rusty material has a texture a little bit bumped by itself. Finally I have 1 texture I use to mix them.
I hope you like that… Suggestions and comments are very welcome. The result is the same you are viewing in this image. The scene contains light and rendering settings too.
Download now :: Vray Rusty Metal shader
 Download V-ray setted scene and just clic render button!
I would to share with you an interior scene, setted for Vray engine render. It works with V-ray 1.47 and V-ray 1.5 too.
My settings is very simple: I used 5 vray lights, one direct light to simule the sun (in this version I don’t use Vray sun). Exponential as color mapping algorithm… all the light emitters are calibrated between them: you just have to clic render to obtain your nice scene.
I suggest to use this scene to study settings and as start to new scene setting.
Download my V-ray interior scene
Some times there is same contest about girl made in 3d or 2d.
The most famous contest in the world is “The most beautiful CG Girl“, powered by 3dm3. in In this kind of contest there are various girls’ images: romantic, poetic, fantastic… and hot too!
In this post I put my favorite hot images I found surfing and surfing in contests ad 3d site!
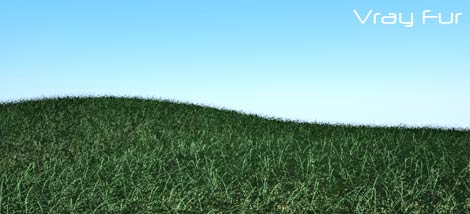 In the last file I showed you how to set VrayDisplacement to obtain realistic grass or carpets. It’s a good solution for middle camera shots.
But how can do if your grass is really near to the camera? You need more details to obtain a realistic render, so it’s time to use Vray Fur!
if you need more information about V-ray fur you could have a look to the official V-ray guide: Vray Fur.
If you need same nice tutorial to understand how to create a grass with vray fur have a look here: Vray Fur tutorial
If you want a very nice scene (xp Style!) to just clic “render” download my gift!
Free Scene: Grass with Vray Fur
 Here the second scene made with Vray sun, this time we have a different atmosphere: the sunset!
It’s very easy to use it, you just need to download it, starting 3d studio max and go testing changing all the parameters with fantasy!
The parameters aren’t not so different from the last scene, the most important change is the sun position. As in the reality the color of the sun changes with the inclination, so you have a darker scene with more orange colors.
I’ve changed Vraysun multiplier and color mapping too. Here same information about the setting. Read in bold the parameters I changed:
N° of lights_ 1Vray Sun intensity_ 1,0Color Mapping_ HSV Esponential (1,4-1,2-1)GI Enviroment _ Skylight (1.0)Time to render_ 1′ 43″ (640×480)
Download Vray sunset
 After 5 years the new short movie direct by Marco Spitoni is finally out! C.O.D.E. Guardian is his name and it was realized in the spare time, as Marco said on his site.
This 3d animation is a wonderful job, anyway a lot of us already knew Marco with the last work: The Hunt.
This movie is totally computer generated and it’s a mix of 2° world war and cyberpunk style, Usa against Germany, a typical theme of 80/90’s that Marco Spitone & Co. tell in this new version.
No more words now… just run to watch it! A 3d short movie totally Made in Italy.
www.cee-gee.com - Sito Ufficiale
Code guardian - link mirror
Code Guardian in QuickTime movie
 However the positive impression lasts just for a couple of seconds, because after a moment the site reloads and because the ugly page I show below.
  So, to recap... they had a very good idea (hiding an horrow movie campaign behind a beauty farm site), but they didn't take it any single step further. There isn't a second level of content (and there was sooo much to play with!), everything is just a wallpaper! Flat, sad and depressing. Who's the one to blame for this lack of energy? The client? The agency?Continue reading... "Horror in Italian interactive"
Looks like MTV are cashing in on the recent government rejection of Snoop into Australia. It seems as though he is going for full Australian citizinship. This looks like the teaser so can't wait for the full campaign... then again - imagine Snoop as an Australian!! 
It doesn't happen everyday that you get as a client a priest (or priesthood), especially when they ask you for a website. Padre Samuel Guedes asked for a Web platform containing, agenda, forms (to get online baptism certificates, for instance) and a Backoffice management system.
The result is what you see, a cool, fresh and coloured website, easy to navigate and with useful information for it users. The three churches reach about 10500 inhabitants, most of them catholic, I wonder how many go online to check church activities.
Paços de Ferreira, 35 kms away from Porto (Portugal), the city where these 3 churches are located, is well known for its furniture, I guess now it will be also known as "the place where God is online" :)